It’s fairly common for cat owners to find themselves constantly at war with their feline friend due to scratching. It’s actually a natural behavior that cats do for reasons such as stretching their feet, sharpening their claws, playing, and visually marking their territory. Also, in this way, they are leaving their scent since cats have glands in their paws.
For some pet owners, declawing their cat is the option to go. However, many people still prefer to treat this dilemma as humanely as possible, and a great way to deal with it is to buy a cat scratcher or learn how to make a cat scratcher.
Recommended Cat Scratching Posts
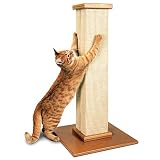
PIONEER PET SMARTCAT THE ULTIMATE SCRATCHING POST
If you want to make sure that you are getting a durable scratching post that is going to hold up well, even in a multi-cat household, this is a great option
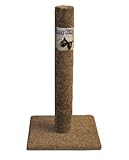
CLASSY KITTY CAT CARPET SCRATCHING POST
Cats will scratch something so you may as well make sure that they are scratching something like the Classy Kitty Cat Carpet Scratching Post
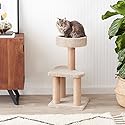
AMAZONBASICS CAT TREE WITH SCRATCHING POSTS
This scratching post is an activity center for your cat, as well as a comfortable place for them to have a nap.
Cat scratchers can be found in local pet stores, department stores, and online stores. It’s available in an array of design with many features your cat will love. However, it can be quite expensive; hence, a great alternative is to make your own cat scratcher if you decide to.
Learn how to make a cat scratcher at home right here. With that said, below are two examples of do-it-yourself cat scratchers that cats will love. They are easy to make and most importantly, interesting enough to satisfy your cat’s strong desire to scratch.
How to Make a Cat Scratcher
To make one, you need to know the type of material your cat loves to get his or her claws on. It should be something that will look appealing based on your cat’s point of view. This is to ensure that your cat will love to scratch on it more than he loves scratching your wallpaper or furniture.
Wooden Vertical Scratching Post
If you notice, cats love to stretch their bodies vertically which is why a vertical scratching post will most likely appeal to them.
To make this vertical scratching post, you will need the following materials:
- 2×4 ft plywood, ½ inch (diameter)
- Sisal fabric
- Sisal rope
- ½-inch crown stapler
- Hacksaw
- Hammer
- 4×4 inches of wood
- Two-inch wood screws
- Non-toxic wood glue
- 4×4 inches beveled wood square
- Ruler
RECOMMENDED PRODUCT
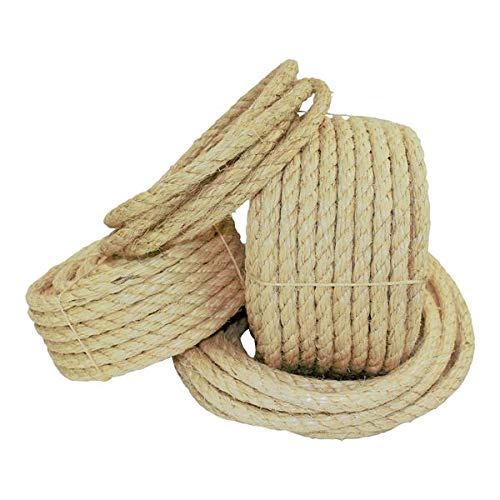
SGT KNOTS TWISTED SISAL ROPE
Very tough and durable
Sharpens and shortens cat claws
100% natural and biodegradable
To Make the Base:
- Make a base wood with the dimensions of 2×4 feet x ½ inches. This base wood can be plywood or particle board depending on which one you prefer. Remember to buy natural, untreated wood to avoid chemicals that might be harmful to your cat.
- Prepare and cut the sisal fabric that you will use to cover the base. A sisal fabric size of 3 x 5 feet is enough to cover the base including the sides. Alternatively, you can also use carpet or any other fabric if you prefer to do so. However, remember that the fabric should be different from the ones you use for your home so that your cat won’t be confused where to scratch. Also, always choose a stiff fabric for a longer-lasting base.
- Flip the fabric upside down and place the wooden base in the middle. Create a notch for each corner. Then, using a wood staple, attach the fabric in place. Put staples for every two-inch distance to keep it secured. Do this on all sides, including the edges. Make sure that everything is snug and neatly folded.
To Make the Post:
- Buy a wood post that has a size of 4×4 inches. Choose untreated wood for the post as well. If you have 2×4 inches of wood available, you can also use this instead. It’s really up to you to choose how long the post should be. As a basis, measure your cat from the nose to the tail and add a few inches.
- Line up the two pieces together and attach them using nails. Make sure that the nails are not exposed in any way to keep your cat from getting injured.
- Flip the base upside down and connect it to one end of the post with the carpeted side facing the post. Check if the post is in the middle of the base before attaching both using wood screws.
- If you want to make your cat’s scratching post a little stylish, you can add a beveled square top as a topper. Use a 4×4 inches of beveled wood square and attach it to the post with wood glue. This is just optional. You can just cover the top with fabric if you want to keep it simple.
- Cover the post with non-toxic wood glue. Wrap the sisal rope around the bottom and secure it using a crown staple. Continue wrapping the rope around the post until you reach the top, or the base of the beveled square topper if it has one. Aside from wood glue, you can also add staples to keep the rope from unraveling. Ensure that the rope is wrapped neatly and tightly together.
- To be certain that the scratching post is safe to use, check all hardware like staples and nails. If you see a staple sticking out, flatten it with a hammer.
Cardboard-Made Cat Scratcher – How to Make a Cat Scratcher Out of Cardboard
Another “purrfect” material to use when making a cat scratcher is heavily corrugated cardboard. Why? Aside from being cheap, corrugated cardboard provides a pleasing feeling to cats. Since the ability to shred the material is what makes scratching fun for cats, the texture of corrugated cardboard fits the bill.
What you need:
- Corrugated cardboard
- Cutting knife or box cutter
- Non-toxic glue
- Ruler
- Medium to large box or box lid
- Catnip leaves (optional)
What you’ll do:
- Get precise measurements of the box that you will use. Measure the width and height and mark the cardboard based on the measurements of the box.
- Use the marks you made on the cardboard as a guide to cut out rectangles with the help of a cutting knife or box cutter. Repeat marking and cutting rectangles until you have enough rectangular cardboards to fill the box with.
- Apply just enough glue on one side of the box or box lid and stick a piece of rectangular cardboard on it to start the process. Apply another layer of glue on the exposed side of the attached rectangle and stick the next piece of cardboard. Continue the process of sticking the cardboard pieces together until the box is filled. You can also sprinkle some catnip leaves on the glue to help attract your cat if it’s his or her first time to use a scratcher.
- Let the glue dry before letting your cat play with it.
Final Thoughts
If you have a cat at home, having a cat scratcher is a necessity to keep your cat happy while keeping yourself sane. Although there are a lot of cat scratchers available, knowing how to make a cat scratcher yourself can be quite handy since you can customize it according to how your cat would want it to be.
